


Overview:
This is Part 3 of Selenium Docker Integration Through Jenkinsfile series. If you have not read the Part 1 & Part 2, I would request you to check below.
- Selenium Docker Integration Through Jenkinsfile – Part 1 – Setting Up Tests & Dependencies
- Selenium Docker Integration Through Jenkinsfile – Part 2 – Building Docker Image & Pushing To Dockerhub
In this part, Lets see how to start a selenium grid at run time, run our automated tests and dispose all the containers after archiving the results.
Udemy – Selenium WebDriver With Docker:
TestAutomationGuru has released a brand new course in Udemy on Selenium WebDriver with Docker. 14 hours course which starts with installing docker from scratch and goes all the way up to running dockerized selenium tests on AWS cloud. Please access the above link which gives you the special discount. You can also get your money back if you do not like the course within 30 days.
Prerequisite:
- You have successfully built a docker image with your automated tests
- Docker image is available in docker hub / some registry
Our Goal:
- We need to start Selenium Grid at run time
- Run all our test modules
- Archive the results
- Remove the test containers & Selenium Grid
Docker Network:
I assume you already have some knowledge on running selenium grid using docker. If you are not sure, I would suggest you to check here. In the article, we had used docker-compose to start all the containers and connect them to the same network automatically.
In this article, without using Docker-Compose, We will create multiple containers as shown below & they all need to be expected to be in the same network. so that they can be discovered easily by their name.
- 1 hub container
- 1 chrome container
- 1 firefox container
- 1 container for each test suite
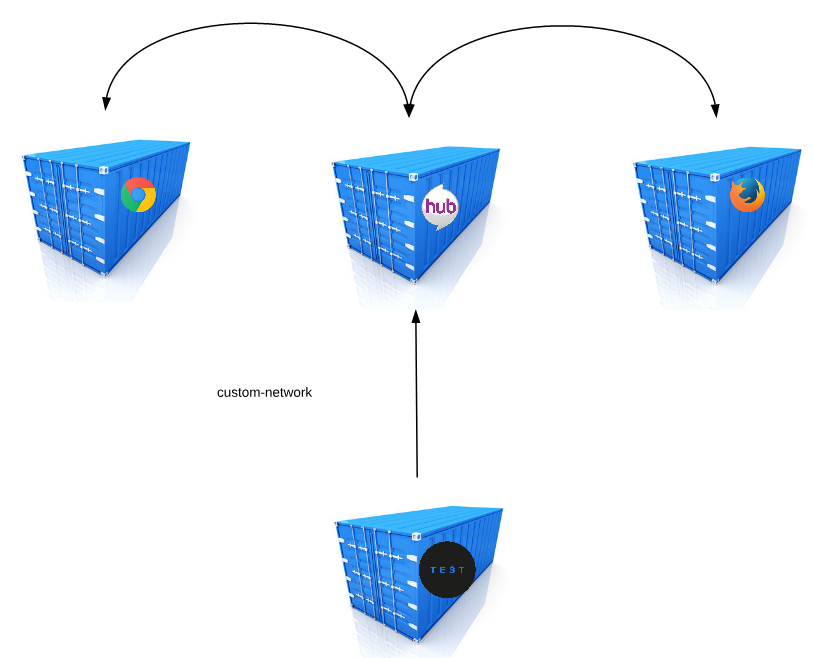

In order to connect these containers, first we need to create a network. Then we need to use the network name while starting other containers as shown here.
For example:
# creating a new network
docker network create mynetwork
# creating container for seleniumhub and chrome and connecting them to the network mynetwork
docker run -d -p 4444:4444 --name seleniumhub --network mynetwork selenium/hub
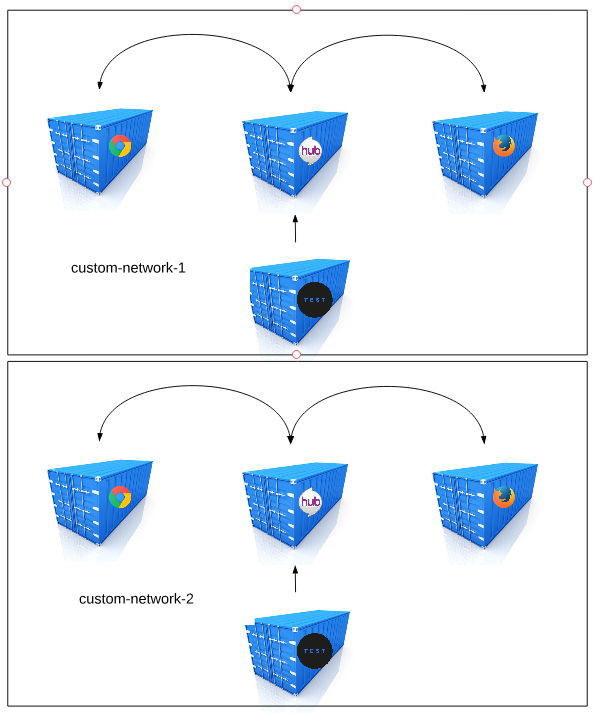
docker run -d -e HUB_PORT_4444_TCP_ADDR=seleniumhub -e HUB_PORT_4444_TCP_PORT=4444 --network mynetwork --name chrome selenium/node-chromeAs shown above, We should be able to create new networks at run time with a new name every time. This might be required because the Jenkins agent/node might be already executing some tests for other reason. So we do not want to mess up with existing containers.
Whenever a Jenkins job is executed, it should be able to create its own network, create all the containers, connect them to the network and terminate later.

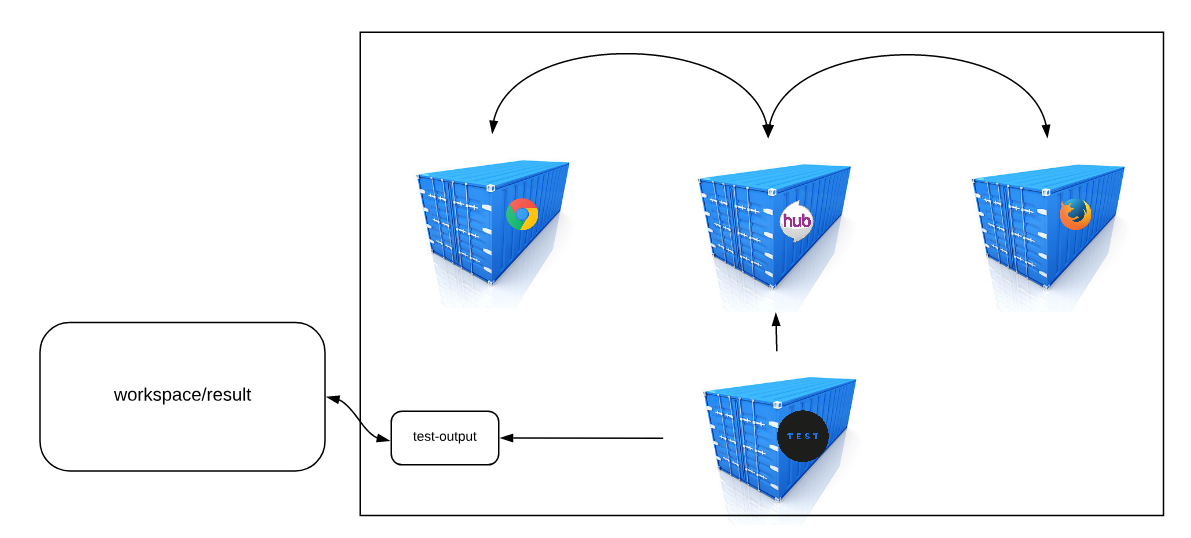
Volume Mapping:
As we had seen in the Part 1 of this series, our test writes results in the test-output folder. It is available within the container. So, while starting the container, we need to provide a directory in the host machine to map that as test-output directory for the container. So that whatever the test writes inside the container, we could access that in the host machine. We need this step as we need to archive our test results after the test run.

Jenkinsfile:
Our Jenkinsfile should have 3 stages
- Stage 1 for setting up selenium grid
- Stage 2 for running tests
- Stage 3 for tearing down the selenium grid
In Stage 2, we might be running multiple test suites in parallel. As you know we have 2 different test suites in our project. We do not want them in sequentially as it would take time. So we would run them in parallel.
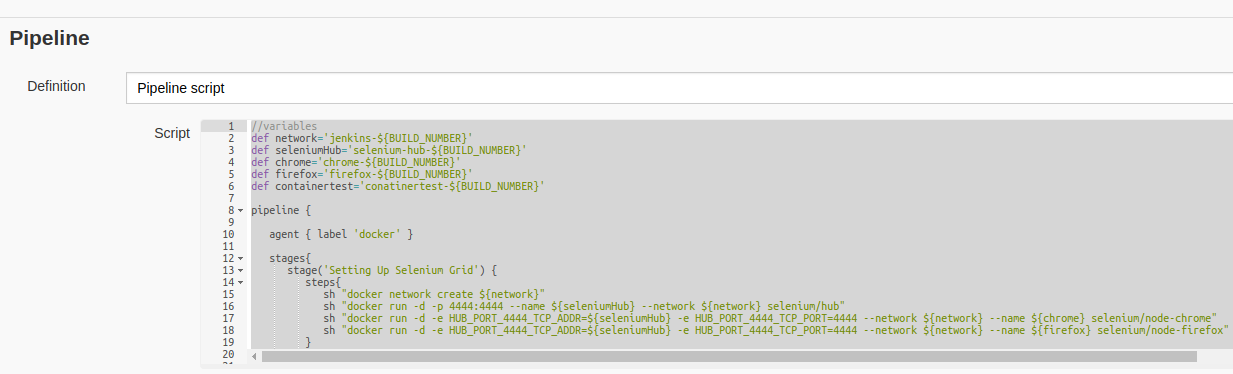
In order to provide unique names to the containers every time, I would use below variables in the pipeline. Also note that we need an agent with docker. Nothing else is required.
//variables
def network='jenkins-${BUILD_NUMBER}'
def seleniumHub='selenium-hub-${BUILD_NUMBER}'
def chrome='chrome-${BUILD_NUMBER}'
def firefox='firefox-${BUILD_NUMBER}'
def containertest='conatinertest-${BUILD_NUMBER}'

pipeline {

   agent any

   stages{
      stage('Setting Up Selenium Grid') {
         steps{
            sh "docker network create ${network}"
            sh "docker run -d -p 4444:4444 --name ${seleniumHub} --network ${network} selenium/hub"
            sh "docker run -d -e HUB_PORT_4444_TCP_ADDR=${seleniumHub} -e HUB_PORT_4444_TCP_PORT=4444 --network ${network} --name ${chrome} selenium/node-chrome"
            sh "docker run -d -e HUB_PORT_4444_TCP_ADDR=${seleniumHub} -e HUB_PORT_4444_TCP_PORT=4444 --network ${network} --name ${firefox} selenium/node-firefox"
         }
      }
      stage('Run Test') {
         steps{
            parallel(
               "search-module":{
                  // a directory 'search' is created for container test-output
                  sh "docker run --rm -e SELENIUM_HUB=${seleniumHub} -e BROWSER=firefox -e MODULE=search-module.xml -v ${WORKSPACE}/search:/usr/share/tag/test-output --network ${network} vinsdocker/containertest"
                  //archive all the files under 'search' directory
                  archiveArtifacts artifacts: 'search/**', fingerprint: true
               },
               "order-module":{
                  // a directory 'order' is created for container test-output
                  sh "docker run --rm -e SELENIUM_HUB=${seleniumHub} -e BROWSER=chrome -e MODULE=order-module.xml -v ${WORKSPACE}/order:/usr/share/tag/test-output  --network ${network} vinsdocker/containertest"
                  //archive all the files under 'order' directory
                  archiveArtifacts artifacts: 'order/**', fingerprint: true
               }
            )
         }
      }
      stage('Tearing Down Selenium Grid') {
          steps {
             //remove all the containers and volumes
             sh "docker rm -vf ${chrome}"
             sh "docker rm -vf ${firefox}"
             sh "docker rm -vf ${seleniumHub}"
             sh "docker network rm ${network}"
          }
        }
   }
}
Jenkins Job:
- Create a new Jenkins pipeline job
- Copy the above pipeline script and run the test

- Open Blue Ocean view (Blue Ocean is a Jenkins plugin) – I could see everything working as expected
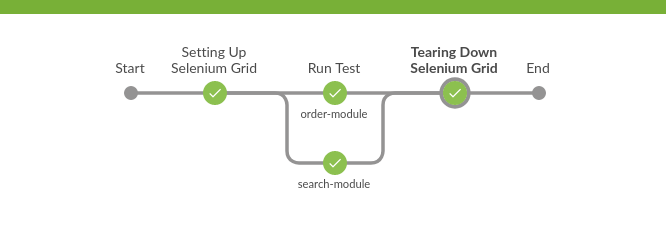

Demo:
- In the above pipeline, there is a chance that when you abort the build in the middle of the run, remaining stages will not be executed. So the selenium grid containers would still be running for ever. So, Tearing down selenium grid should be part of post build process which is executed always irrespective of the status of the build.
pipeline {

   agent { label 'docker' }

   stages{
      stage('Setting Up Selenium Grid') {
         steps{
            sh "docker network create ${network}"
            sh "docker run -d -p 4444:4444 --name ${seleniumHub} --network ${network} selenium/hub"
            sh "docker run -d -e HUB_PORT_4444_TCP_ADDR=${seleniumHub} -e HUB_PORT_4444_TCP_PORT=4444 --network ${network} --name ${chrome} selenium/node-chrome"
            sh "docker run -d -e HUB_PORT_4444_TCP_ADDR=${seleniumHub} -e HUB_PORT_4444_TCP_PORT=4444 --network ${network} --name ${firefox} selenium/node-firefox"
         }
      }
      stage('Run Test') {
         steps{
            parallel(
               "search-module":{
                  sh "docker run --rm -e SELENIUM_HUB=${seleniumHub} -e BROWSER=firefox -e MODULE=search-module.xml -v ${WORKSPACE}/search:/usr/share/tag/test-output --network ${network} vinsdocker/containertest"
                  archiveArtifacts artifacts: 'search/**', fingerprint: true
               },
               "order-module":{
                  sh "docker run --rm -e SELENIUM_HUB=${seleniumHub} -e BROWSER=chrome -e MODULE=order-module.xml -v ${WORKSPACE}/order:/usr/share/tag/test-output  --network ${network} vinsdocker/containertest"
                  archiveArtifacts artifacts: 'order/**', fingerprint: true
               }
            )
         }
      }
    }
    post{
      always {
         sh "docker rm -vf ${chrome}"
         sh "docker rm -vf ${firefox}"
         sh "docker rm -vf ${seleniumHub}"
         sh "docker network rm ${network}"
      }
   }
}
Summary:
We were able to successfully start the selenium grid, running our test inside containers and terminate them all at run time. By dockerizing our automated tests, we should be able to run our tests in the cloud/AWS/Google cloud environments in no time. By using Jenkinsfile, we are able to document the complete build information in a text file and reuse. We were also able to run multiple test suites in parallel using Jenkinsfile.
Happy Testing & Subscribe 🙂