

Overview:
In this tutorial, I would like to show you how to create a real time application using RSocket WebSocket & Spring Boot. If you are new to RSocket, take a loot these articles first.
- RSocket With Java – Getting Started
- RSocket With Spring Boot
- RSocket – Uploading Files With Reactive Programming
Sample Application:
Our application has 2 endpoints.
- number.stream
- Whenever the server receives a number “N”, it emits number from 1 to N with 1 second delay. So for every request, server might send multiple responses back via a single WebSocket connection.
- number.channel
- This is for bi-directional stream. That is as and when the user enters a number, it is sent to the back-end which calculates the square for the given number, responds back.
Note: This example might look very simple. Here we are learning the real-time communication between client and server and how it works. If we can achieve this, we can use this for applications like YouTube/Netflix for real time video/movie recommendations. The concept is same!
RSocket WebSocket – Server Side:
The rsocket server-side implementation for our requirements will be as shown here! Spring Boot does all the heavy lifting here.
-
Controller
@Controller
public class RSocketController {

    @MessageMapping("number.stream")
    public Flux<Integer> responseStream(Integer number) {
        return Flux.range(1, number)
                    .delayElements(Duration.ofSeconds(1));
    }

    @MessageMapping("number.channel")
    public Flux<Long> biDirectionalStream(Flux<Long> numberFlux) {
        return numberFlux
                .map(n -> n * n)
                .onErrorReturn(-1L);
    }

}-
application.properties
The port and the mapping-path could be anything. The transport is TCP by default. We need to add the transport as WebSocket to make this explicit as WebSocket server.
spring.rsocket.server.port=6565
spring.rsocket.server.transport=websocket
spring.rsocket.server.mapping-path=/rsocket
RSocket WebSocket – Client Side:
The server side was simple, but we have some work to do for the client-side communication. We can not achieve this easily just by using vanilla JavaScript. We have to bring in some node modules.
- Create a project by issuing below command
npm init -y- My project structure looks like this. So add the files as shown here.

- Add the dependencies as shown here. We need only this dependency rsocket-websocket-client. We need few additional dependencies for development purposes.
{
  "name": "rsocket-websocker-client",
  "version": "1.0.0",
  "description": "",
  "main": "index.js",
  "scripts": {
    "test": "echo \"Error: no test specified\" && exit 1",
    "build": "webpack --mode=development",
    "serve": "webpack-dev-server --open"
  },
  "author": "",
  "license": "ISC",
  "devDependencies": {
    "clean-webpack-plugin": "^3.0.0",
    "html-webpack-plugin": "^4.3.0",
    "webpack": "^4.44.1",
    "webpack-cli": "^3.3.12",
    "webpack-dev-server": "^3.11.0"
  },
  "dependencies": {
    "rsocket-websocket-client": "0.0.19"
  }
}- webpack.config.js
const path = require('path');
const HtmlWebpackPlugin = require('html-webpack-plugin');

module.exports = {
    mode: 'development',
    devServer: {
        port: 8081,
        contentBase: './dist',
     },
     entry: './src/index.js',
     output: {
         filename: 'bundle.js',
         path: path.resolve(__dirname, 'dist'),
         publicPath: '/'
     },
     plugins: [
        new HtmlWebpackPlugin({
            inlineSource: '.(js|css)$',
            template: __dirname + `/src/index.html`,
            filename: __dirname + `/dist/index.html`,
            inject: 'head',
          })
     ]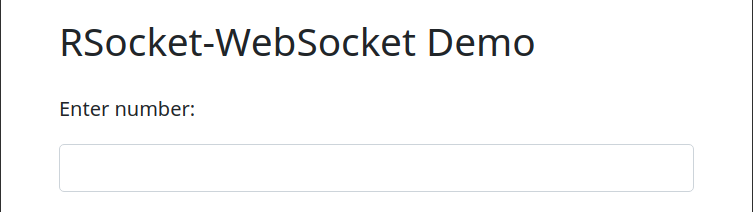
}- index.html
<body>
    <div class="container mt-3">
        <h1>RSocket-WebSocket Demo</h1>
        <div class="row">
             <div class="col">
                <p class="font-weight-light mt-3">Enter number:</p>
                <input type="text" class="form-control"  id="n">
            </div>
        </div>
        <div class="row">
            <ul class="list-group mt-5 pl-2"  id="result"></ul>
        </div>
    </div>
</body>
- index.js
- First we import specific dependencies.
- Then we create the rsocket client
- We have a response and error handlers
- We make a request to the backend and handle the response by subscribing
- We register the listeners when the websocket connection is established.
import { RSocketClient, JsonSerializer, IdentitySerializer } from 'rsocket-core';
import RSocketWebSocketClient from 'rsocket-websocket-client';

// backend ws endpoint
const wsURL = 'ws://localhost:6565/rsocket';

// rsocket client
const client = new RSocketClient({
    serializers: {
        data: JsonSerializer,
        metadata: IdentitySerializer
    },
    setup: {
        keepAlive: 60000,
        lifetime: 180000,
        dataMimeType: 'application/json',
        metadataMimeType: 'message/x.rsocket.routing.v0',
    },
    transport: new RSocketWebSocketClient({
        url: wsURL
    })
});

// error handler
const errorHanlder = (e) => console.log(e);
// response handler
const responseHanlder = (payload) => {
    const li = document.createElement('li');
    li.innerText = payload.data;
    li.classList.add('list-group-item', 'small')
    document.getElementById('result').appendChild(li);
}

// request to rsocket-websocket and response handling
const numberRequester = (socket, value) => {
    socket.requestStream({
        data: value,
        metadata: String.fromCharCode('number.stream'.length) + 'number.stream'
    }).subscribe({
        onError: errorHanlder,
        onNext: responseHanlder,
        onSubscribe: subscription => {
            subscription.request(100); // set it to some max value
        }
    })
}

// once the backend connection is established, register the event listeners
client.connect().then(socket => {
    document.getElementById('n').addEventListener('change', ({srcElement}) => {
        numberRequester(socket, parseInt(srcElement.value));
    })
}, errorHanlder);
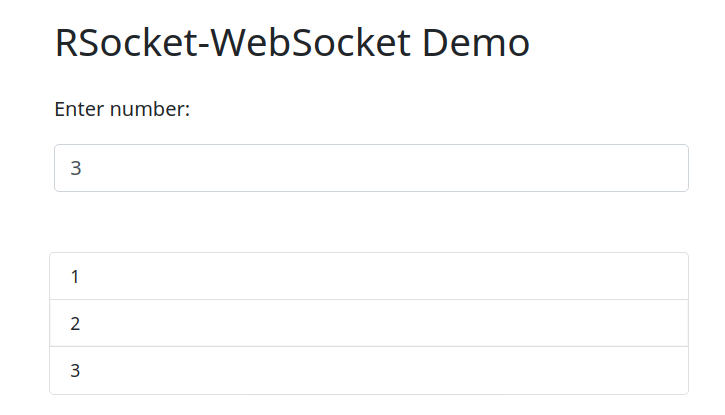
- We can launch the front-end application at port 8081. Whenever I enter a number, It is sent to the RSocket back-end. For ex: If I enter 3, I get 3 numbers back as shown here.
RSocket With WebSocket – Stream:
- Lets take a look at the change required for the bidirectional stream as well.
- We introduce the FlowableProcessor which will act as both publisher and subscriber. The front-end will be publishing values which will be subscribed by the backend application.
- The idea here is – whenever I enter a number, the keyup event will be publishing values. So I get the square for the given number immediately.
// reactive stream processor
const processor = new FlowableProcessor(sub => {});

const numberRequester = (socket, processor) => {
    socket.requestChannel(processor.map(i => {
        return {
            data: i,
            metadata: String.fromCharCode('number.channel'.length) + 'number.channel'
        }
    })).subscribe({
        onError: errorHanlder,
        onNext: responseHanlder,
        onSubscribe: subscription => {
            subscription.request(100); // set it to some max value
        }
    })
}

client.connect().then(sock => {
    numberRequester(sock, processor);
    document.getElementById('n').addEventListener('keyup', ({srcElement}) => {
        if(srcElement.value.length > 0){
            processor.onNext(parseInt(srcElement.value))
        }
    })
}, errorHanlder);- Demo
- We can see how our bi-directional stream works in this video.
Summary:
We were able to successfully establish the RSocket WebSocket client-server communication and develop a simple application with that. We can use this for the real-time video recommendations, gaming applications etc.
The source code for this demo is here.
Happy learning 🙂
Hi @vins.
Shall we use for video streaming application using Rsocket?
Hi,
Yes, Sure we should be able to!
Thanks.
How can I open multiple tabs and have the numbers sent in all of them as well?
We can if we have the same user session – it is a work around.