

Overview:
In this tutorial, I would like to demo Redis Master Slave (Read Replicas) using docker compose for local development purposes for a Spring Boot application.
If you are new to Spring Boot Redis – check the below articles first.
Redis Master Slave:
Redis is an extremely fast in-memory DB and it is great for caching frequently accessed data for an application. Most of the applications have read heavy operations which involves complex queries with multiple tables joins. So it makes perfect sense to cache such information in redis when it is not going to change every time. Even though it helps with application performance, It might add load on a single redis instance when all the instances of app-servers keep on sending read and write requests to redis.
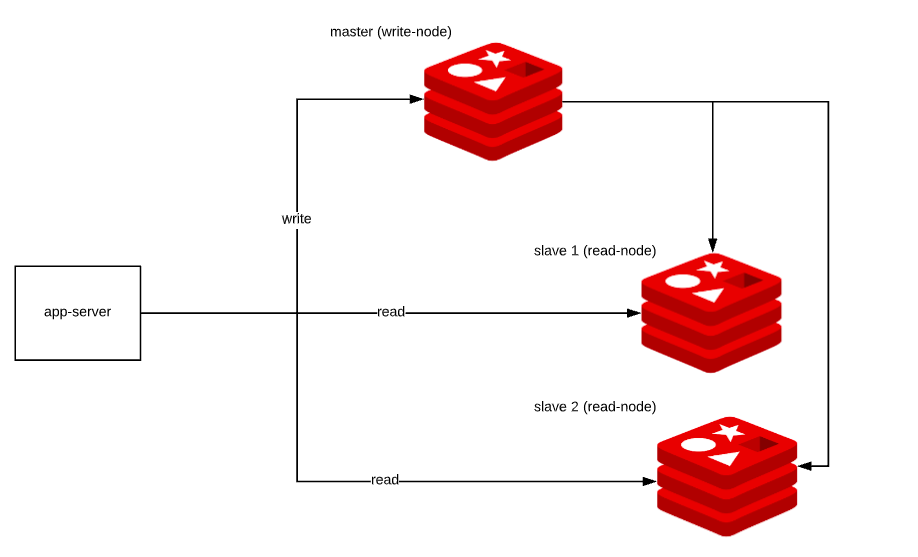
We can scale redis horizontally. We can run multiple instances of Redis with master slave architecture where master would be the write node and slaves would act as read-only nodes. Any updates to the master would be automatically synced with slave nodes asynchronously. Any write attempt to the slave nodes would be declined.
Redis Master Slave – Setup:
- Setting up redis master slave is very easy! First download this redis conf file from here
- Look for the REPLICATION section in the file.
################################# REPLICATION #################################

# Master-Replica replication. Use replicaof to make a Redis instance a copy of
# another Redis server. A few things to understand ASAP about Redis replication.
#
#   +------------------+      +---------------+
#   |      Master      | ---> |    Replica    |
#   | (receive writes) |      |  (exact copy) |
#   +------------------+      +---------------+
#
# 1) Redis replication is asynchronous, but you can configure a master to
#    stop accepting writes if it appears to be not connected with at least
#    a given number of replicas.
# 2) Redis replicas are able to perform a partial resynchronization with the
#    master if the replication link is lost for a relatively small amount of
#    time. You may want to configure the replication backlog size (see the next
#    sections of this file) with a sensible value depending on your needs.
# 3) Replication is automatic and does not need user intervention. After a
#    network partition replicas automatically try to reconnect to masters
#    and resynchronize with them.
#
# replicaof <masterip> <masterport>- Un-comment the replicaof property & update with master node ip and port details.
- Lets assume that we run 3 instances of redis with below names in a network
- master
- slave-1
- slave-2
- Then slave-1 and slave-2 should be updated with the configuration as shown below.
replicaof master 6379- We can use the below docker-compose file which will launch 1 master and 2 slaves of redis instances.
- In the below docker-compose file, we do the volume mapping to the redis slave instances to share the conf file
- I have placed the above redis.conf file in the local conf directory. Update your docker-compose file accordingly.
- Redis slaves would be automatically connected to the master when they launch.
version: '3'
services:
  master:
    container_name: master
    image: redis
    ports:
      - 6379:6379
  slave-1:
    container_name: slave-1
    image: redis
    ports:
      - 16379:6379
    volumes:
      - ./conf:/usr/local/etc/redis/
    command: redis-server /usr/local/etc/redis/redis.conf
  slave-2:
    container_name: slave-2
    image: redis
    ports:
      - 26379:6379
    volumes:
      - ./conf:/usr/local/etc/redis/
    command: redis-server /usr/local/etc/redis/redis.conf
  redis-commander:
    container_name: redis-commander
    hostname: redis-commander
    image: rediscommander/redis-commander:latest
    restart: always
    environment:
    - REDIS_HOSTS=master:master,slave-1:slave-1,slave-2:slave-2
    ports:
    - "8081:8081"
Redis Commander – UI:
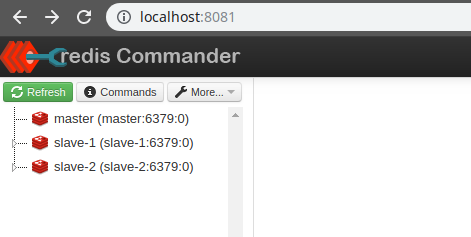
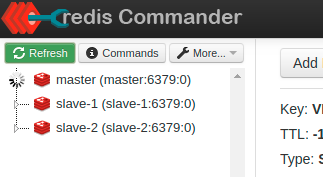
- Once you bring the docker-compose services up and running using the above file, when you access localhost:8081, you should be able to access redis-commander tool. You should also be able to see master and slave nodes as shown here.
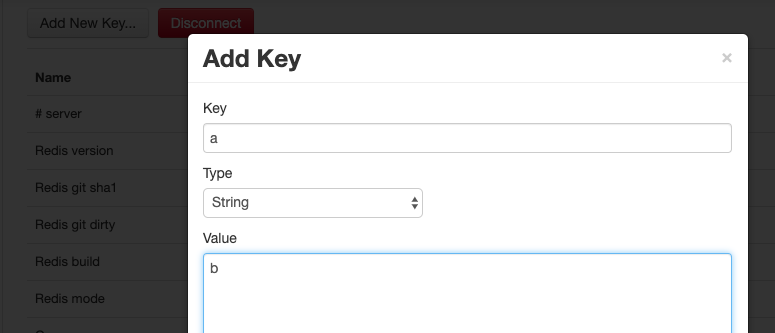
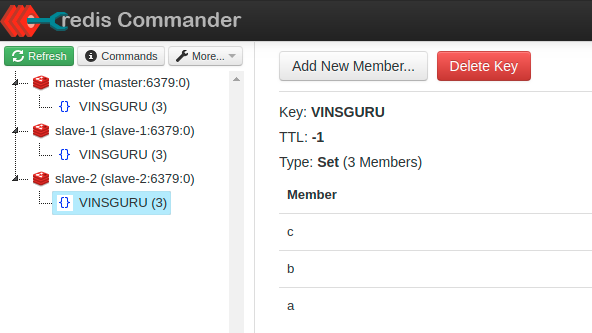
- Lets try to add a new key under master as shown here
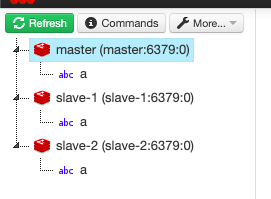
- Immediately the key added is reflected in both slaves.
- Sometimes we might want to expire a key after specific duration. So let’s test that. Run the below command on master which will make the key ‘a’ expire after 10 seconds on master.
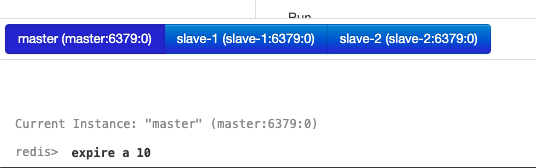
- Running the above command makes the key ‘a’ expire on the master after 10 seconds. Any changes on the master are getting reflected immediately on the slaves due to which the key ‘a’ is removed from both slaves as well.
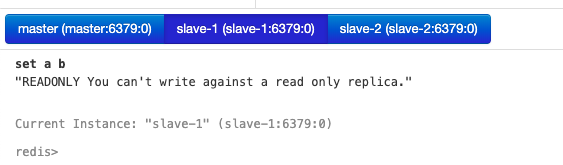
- Try to run ‘set a b’ command on the one of the slave nodes. We get the below error message as slaves are read-only. They can not be used for writing.
Redis Master Slave With Spring Boot:
Lets create a simple Spring Boot application to see how we can use the Redis cluster with master-slaves.
- Create a spring boot project with below dependencies
<dependency>
  <groupId>org.springframework.boot</groupId>
  <artifactId>spring-boot-starter-data-redis</artifactId>
</dependency>
<dependency>
  <groupId>org.springframework.boot</groupId>
  <artifactId>spring-boot-starter-web</artifactId>
</dependency>- application.yaml
redis:
  master:
    host: localhost
    port: 6379
  slaves:
    - host: localhost
      port: 16379
    - host: localhost
port: 26379- Configuration Bean
@Configuration
@ConfigurationProperties(prefix = "redis")
public class RedisConfiguration {

    private RedisInstance master;
    private List<RedisInstance> slaves;

    RedisInstance getMaster() {
        return master;
    }

    void setMaster(RedisInstance master) {
        this.master = master;
    }

    List<RedisInstance> getSlaves() {
        return slaves;
    }

    void setSlaves(List<RedisInstance> slaves) {
        this.slaves = slaves;
    }

    @Bean
    public LettuceConnectionFactory redisConnectionFactory() {
        LettuceClientConfiguration clientConfig = LettuceClientConfiguration.builder()
                .readFrom(ReadFrom.REPLICA_PREFERRED)
                .build();
        RedisStaticMasterReplicaConfiguration staticMasterReplicaConfiguration = new RedisStaticMasterReplicaConfiguration(this.getMaster().getHost(), this.getMaster().getPort());
        this.getSlaves().forEach(slave -> staticMasterReplicaConfiguration.addNode(slave.getHost(), slave.getPort()));
        return new LettuceConnectionFactory(staticMasterReplicaConfiguration, clientConfig);
    }

    private static class RedisInstance {

        private String host;
        private int port;

        String getHost() {
            return host;
        }

        void setHost(String host) {
            this.host = host;
        }

        int getPort() {
            return port;
        }

        void setPort(int port) {
            this.port = port;
        }
    }

}- Rest Controller
@RestController
public class RedisController {

    private static final String KEY = "VINSGURU";

    @Autowired
    private StringRedisTemplate template;

    @GetMapping("/{name}")
    public void addToSet(@PathVariable String name) {
        this.template.opsForSet().add(KEY, name);
    }

    @GetMapping("/get")
    public Set<String> getKeyValues() {
        return this.template.opsForSet().members(KEY);
    }

}- I send the below requests
http://localhost:8080/a
http://localhost:8080/b
http://localhost:8080/c- Check the redis-commander. We can see the values are getting reflected in the slaves as well.
- Send the below curl request to access the slave nodes
http://localhost:8080/get

# HTTP Response
["c","b","a"]- Lets bring the master node down. I ran the below command to bring master node down.
- docker-compose stop master
- Both application and redis-commander can not connect to the master which is of course expected.

- Send the below requests
# Try to add new item. It will hang as master is down

http://localhost:8080/d


# Try to access existing items. It will give proper response as we read from read only nodes

http://localhost:8080/get
Summary:
Redis Master Slave setup is very easy. The redis replication is also very fast. I did a performance test to add 10000 keys into Redis master with 10 concurrent users using JMeter. I am able to see all the 10000 keys in the slave nodes almost immediately.
Read more about Redis.
- Redis PubSub With Spring Boot
- Redis Stream With Spring Boot – Real Time Data Processing
- Microservice Pattern – Priority-Queue Pattern With Spring Boot + Redis
This project is available here.
very good demo
Tks
Hi Vinoth ,
Can the same set up be used with jedis instead of Lettuce ?
It should work with Jedis.
Hi vin,
We have implemented the same logic
But getting redissytemexception saying writes cannot be performed to the read port.this happens when the master is going down automatically the slave is promoted as master and writes are happening to the slave port which is having only read rights.Please help us to solve this by providing some workaround
Sorry for the late response. You need to use Sentinel for that. https://docs.spring.io/spring-data/data-redis/docs/current/reference/html/#redis:sentinel