


Overview:
In this tutorial, I would like to show you how to do real time data processing by using Kafka Stream With Spring Boot.
Stream Processing:
In the good old days, we used to collect data, store in a database and do nightly processing on the data. It is called batch processing!
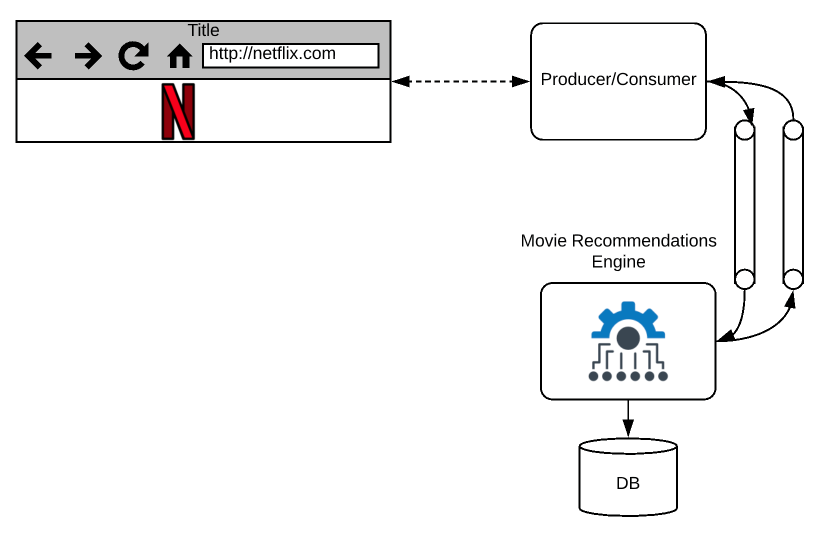
In this Microservices era, we get continuous / never ending stream of data. Sometimes delaying this data processing might have a severe impact in our business. For example, Let’s consider an application like Netflix / YouTube. Based on the movie/videos we surf, these applications show immediate recommendations. It provides much better user experience and helps with the business. Similarly when we get all the credit card transactions, a Bank might want to check if there is any fraudulent activity and block the card immediately if it is found! Credit card provider would not want to delay this as part of nightly processing.

Stream processing is a real time continuous data processing. Lets see how we can achieve a simple real time stream processing using Kafka Stream With Spring Boot.
Prerequisite:
A basic knowledge on Kafka is required. Read the below articles if you are new to this topic.
- Kafka – Local Infrastructure Setup Using Docker Compose
- Kafka – Creating Simple Producer & Consumer Applications Using Spring Boot
- Kafka – Scaling Consumers Out In A Consumer Group
Sample Application:
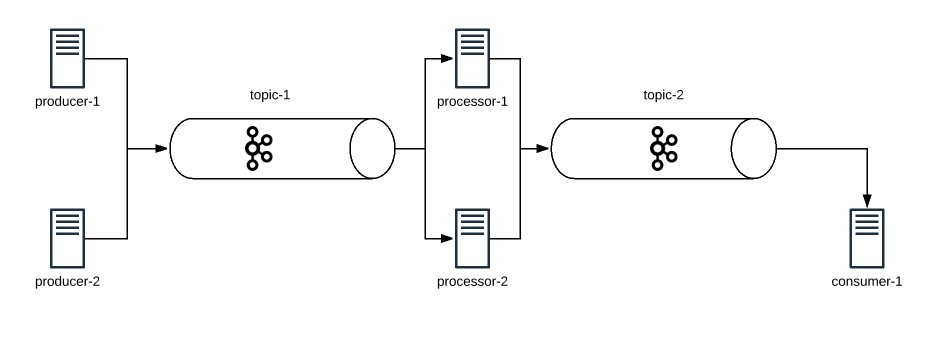
To demo this real time stream processing, Lets consider a simple application which contains 3 microservices.
- Producer: This Microservice produces some data
- In the real world, Producer could be you browser/some user action sending movie surf history / credit card transactions etc.
- In this demo, I would be generating numbers sequentially from 1 to N, every second just to keep things simple to understand.
- Processor: This Microservice consumes the data, does some processing on the data and writes back to another topic
- In the real world, this could be the movie recommendation engine for Netflix.
- In this demo, I would be skipping all the odd numbers and finding the square of the even numbers.
- Consumer: This Microservice consumes the processed data.
- In the real world, this could be your browser again to get the latest recommendations based on your movie browsing.
- In this demo, I would consume the data and print it on the console.
Producer, Processor and Consumer are 3 different applications connected via 2 different Kafka topics as shown below.

Kafka Set up:
Take a look at this article Kafka – Local Infrastructure Setup Using Docker Compose, set up a Kafka cluster. Once done, create 2 topics.
-
- numbers (Topic 1 / Source topic)
- squaredNumbers (Topic 2 / Sink topic)
Spring Boot – Project Set up:
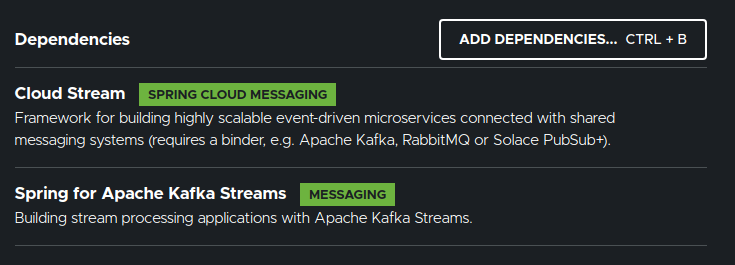
- Create a simple spring boot application with below dependencies.

- I create a multi-module maven project with project structure as shown below where each maven-module is a Spring Boot application. I share the link for this project at the end of this article.


Java Functional Interface:
Spring Cloud Functions simplifies these application development by using below Java functional interfaces.
| Application Type | Java Functional Interface |
|---|---|
| Kafka Producer | Supplier |
| Kafka Consumer | Consumer |
| Kafka Processor | Function |
Kafka Stream Producer:
Working on Kafka Stream with Spring Boot is very easy! Spring Boot does all the heavy lifting with its auto configuration. I create a simple bean which will produce a number every second.
- If the bean type is supplier, Spring Boot treats it as a producer.
- I use flux as it is going to be a data stream
@Configuration
public class KafkaProducer {

    /*
    *   produce a number from 1, every second
    *   Supplier<T> makes this as kafka producer of T
    * */

    @Bean
    public Supplier<Flux<Long>> numberProducer(){
        return () -> Flux.range(1, 1000)
                        .map(i -> (long) i)
                        .delayElements(Duration.ofSeconds(1));
    };

}
Now important question is where would the data be written into? If you remember, we had created a topic for this – numbers. We configure that via application.yaml as shown below.
- spring.cloud.stream.function.definition where you provide the list of bean names (; separated).
- spring.cloud.stream.bindings.numberProducer-out-0.destination configures where the data has to go!
- out indicates that Spring Boot has to write the data into the Kafka topic. As you would have guessed, to read the data, simply use in.
- Spring does it own serialization/deserialization. I skip that and I go with Kafka native serialization and deserialization with these properties
- spring.cloud.stream.bindings.numberProducer-out-0.producer.use-native-encoding
- spring.cloud.stream.kafka.bindings.numberProducer-out-0.producer.configuration.value
- Then I configure the kafka brokers address.
spring.cloud.stream:
  function:
    definition: numberProducer
  bindings:
    numberProducer-out-0:
      destination: numbers
      producer:
        use-native-encoding: true
  kafka:
    bindings:
      numberProducer-out-0:
        producer:
          configuration:
            value:
              serializer: org.apache.kafka.common.serialization.LongSerializer
    binder:
      brokers:
        - localhost:9091
        - localhost:9092
Kafka Stream Consumer:
As you had seen above, Spring Boot does all the heavy lifting. This is what I have to do to consume the data.
- Create a bean of type Consumer to consume the data from a Kafka topic.
- KStream<String, Long>
- Key type is String
- Value type is Long
- We simply print the consumed data.
@Configuration
public class KafkaConsumer {

    /*
    *   consume the numbers received via kafka topic
    *   Consumer<T> makes this as kafka consumer of T
    * */

    @Bean
    public Consumer<KStream<String, Long>> squaredNumberConsumer(){
        return stream -> stream.foreach((key, value) -> System.out.println("Square Number Consumed : " + value));
    };

}- application.yaml
- As usual I update the spring cloud function bean name
- We assume that squaredNumbers topic is created already and we consume the data from the topic.
- To consume the data I use in
spring.cloud.stream:
  function:
    definition: squaredNumberConsumer
  bindings:
    squaredNumberConsumer-in-0:
      destination: squaredNumbers
  kafka:
    binder:
      brokers:
        - localhost:9091
        - localhost:9092
Kafka Stream Processor:
Processor is both Producer and Consumer. It consumes the data from 1 topic and produces data for another topic.
In our case, we have to do the following
- consume the data from numbers topic
- remove the odd numbers
- squares the even number
- write back into another topic.
Lets create the processor by using the corresponding Functional Interface in Java which is Function<T, R>.
- We consume the data which is KStream<String, Long>
- We do some processing
- Then we return the KStream<String, Long>. Do note that the return type could be anything. Does not have to be same as Input type.
@Configuration
public class KafkaProcessor {

    /*
    *   process the numbers received via kafka topic
    *   Function<T, R> makes this as kafka stream processor
    *   T is input type
    *   R is output type
    *
    * */

    @Bean
    public Function<KStream<String, Long>, KStream<String, Long>> evenNumberSquareProcessor(){
        return kStream ->  kStream
                            .filter((k, v) -> v % 2 == 0)
                            .peek((k, v) -> System.out.println("Squaring Even : " + v))
                            .mapValues(v -> v * v);
    };

}- application.yaml
- Using in we consume the data, then to write we use out.
spring.cloud.stream:
  function:
    definition: evenNumberSquareProcessor
  bindings:
    evenNumberSquareProcessor-in-0:
      destination: numbers
    evenNumberSquareProcessor-out-0:
      destination: squaredNumbers
  kafka:
    binder:
      brokers:
        - localhost:9091
        - localhost:9092
Kafka Stream Processing:
Now at this point, everything seems to be ready. Start the applications. Once the apps are connected to the Kafka brokers, we can see the console outputs as shown below.
- Processor
Squaring Even : 2
Squaring Even : 4
Squaring Even : 6
Squaring Even : 8
Squaring Even : 10
Squaring Even : 12
Squaring Even : 14- Consumer
Square Number Consumed : 4
Square Number Consumed : 16
Square Number Consumed : 36
Square Number Consumed : 64
Square Number Consumed : 100
Square Number Consumed : 144
Square Number Consumed : 196
Bonus: Kafka + Spring Boot – Event Driven:
When we have multiple microservices with different data sources, data consistency among the microservices is a big challenge. You can take a look at this article how the problem is solved using Kafka for Spring Boot Microservices – here.
Summary:
We were able to successfully demonstrate real time data processing by using Kafka Stream with Spring Boot.
Learn more about Kafka + SpringBoot.
Check out other Streaming solutions – Redis Stream With Spring Boot – Real Time Data Processing
The source code is available here.
Happy learning 🙂