


Overview:
There are so many ways and tools available to test a REST API.
When I had a requirement to test a REST API, after looking at various tools & options, I settled on JMeter for the following reasons.
- JMeter is FREE & Open Source.
- JMeter can read your testdata from the CSV file out of the box. Parameterization is very easy.
- API can be tested with multiple sets of data easily.
- JMeter has a powerful ‘Response Extractor‘ s – which can be used to extract information from the API response (JSON / XML / Regular expression) and use it in the subsequent requests in the test.
- JMeter has tons of ‘Assertions‘ – to verify the if the API response is as expected.
- The JMeter test we created for functional testing can also be used for performance testing.
- ANT / Maven / Gradle plug-ins to execute the test as part of your build.
- Easy integration with Jenkins to run the test periodically & Jenkins has a plugin for JMeter to parse the result file & display nice charts.
Installing JMeter:
If you do not have JMeter installed in your machine, check this link. It has detailed steps to install JMeter.
Once you launch JMeter, You will see Test Plan element which is the root node of the JMeter test under which we will add various JMeter elements for our test.
Create a Simple API JMeter Test:
Now Lets add the required elements for our test.
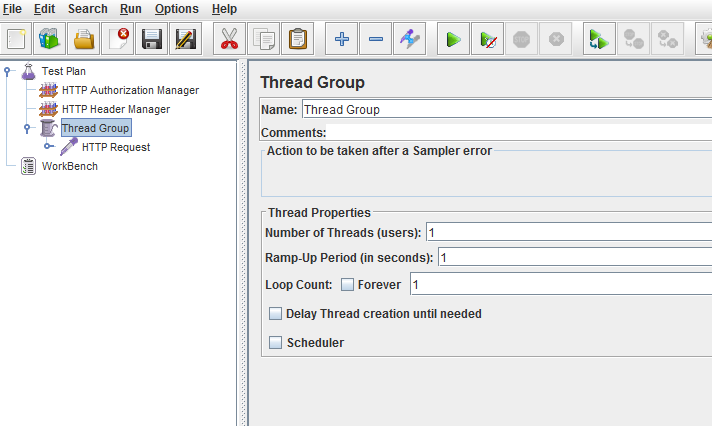
- Add a Thread Group under the test plan. (Rightclick on Test Plan –> Add –> Threads (users) –> Thread Group)
- We update the number of users, number of iterations etc in the Thread Group.
- Let them be 1 for now.
- Add a HTTP Request Sampler under the Thread Group. (Rightclick on Thread Group –> Add –> Sampler –>HTTP Request)
- Sampler is a type of JMeter request.
- REST is an approach & it uses HTTP protocol. So we add the HTTP Request sampler.
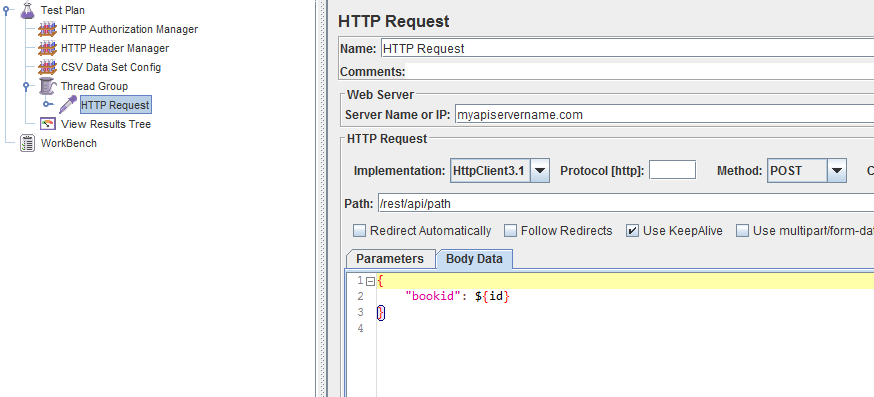
- Update Server IP / Hostname as myapiservername.com [For this API url : http://myapiservername.com/rest/api/path]
- Update the API path /rest/api/path
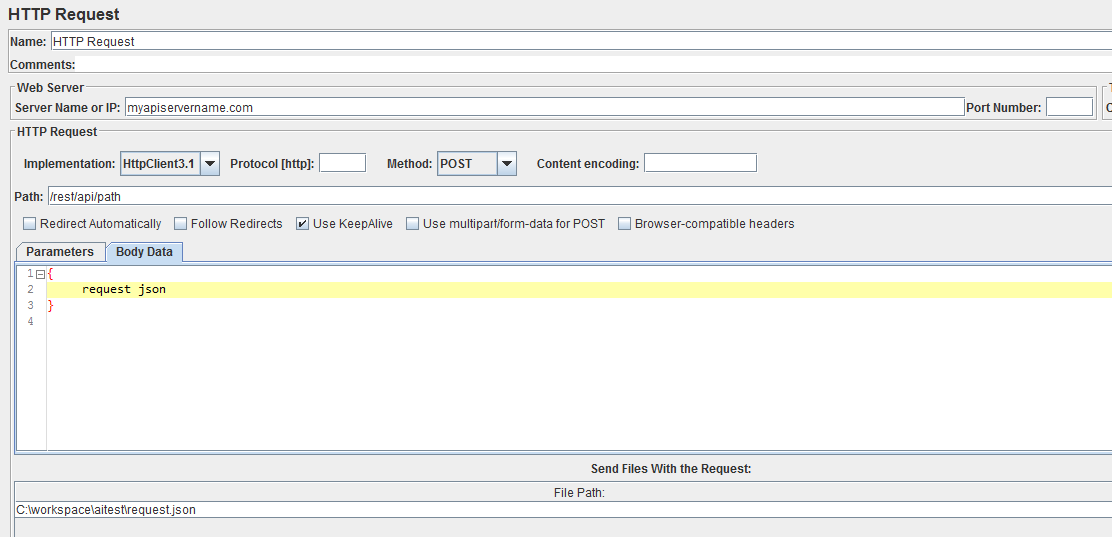
- Send Files with the Request – should have the path of your request JSON file OR include the request JSON in the Body Data section of the HTTP Request.
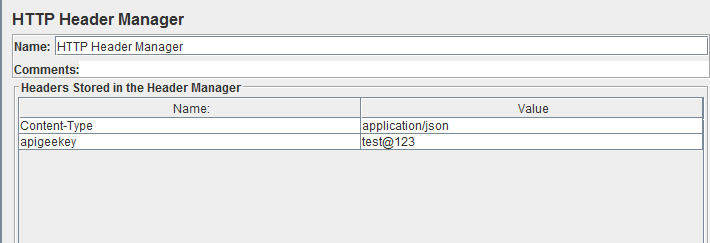
- Add a HTTP Header Manager (Rightclick on Test Plan –> Add –> Config element –> HTTP Header Manager)
- In HTTP Header Manner config page, click on ‘Add’.
- Include this name-value pair.
- Name=Content-Type
- Value=application/json
- If your API expects APIGEE key, then include it here or ignore.
- Name=apigeekey
- Value=test@123
- Add a HTTP Authorization Manager – Required in case of any authentication. (Rightclick on Test Plan –> Add –> Config element –> HTTP Authorization Manager)
- Update the Base URL as http://myapiservername.com
- Update the username
- Update the password
- Under Test Plan, add a listener – View Results Tree
Your JMeter test will look like this (I did not include the listener).

Now if you run this, you should be able to send the request and get the response successfully.
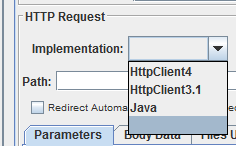
Note: If it does not work for some reason, try changing the HTTP Request Implementation to Java/Other values and give a try.

Whatever we have done so far is a very simple test – like a POC. Now lets see how it can be improved further.
Parameterizing the test data:
In the above example, we send the hard coded request JSON to test the API. We might have to test the API for different sets of data.
Lets take a very simple example, I have an API which gives the book name and price details for the book id request i send.
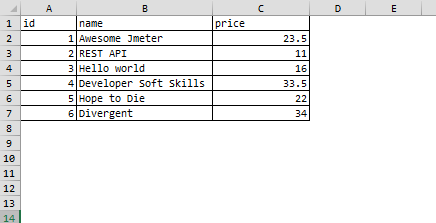
Testdata in CSV:
Request JSON:
Lets assume that our API request in the below format.
{
    "bookid": 1
}
Response JSON:
Lets assume our API response is as given below.
{
    "bookname": "Awesome Jmeter"
    "bookprice": 23.5
}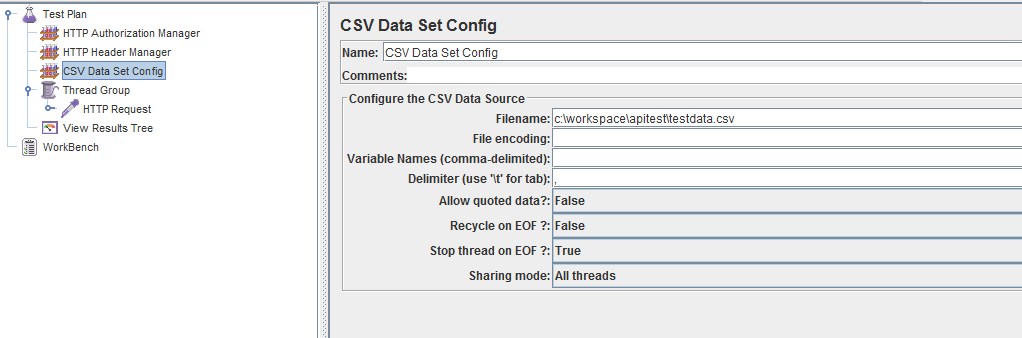
Add CSV Data Set Config under Test Plan & update the details as given above.
- Variable Names : can be blank. JMeter will take the CSV column names as variable names.
- Recycle on EOF? : should be FALSE. We are going to test each row only once.
- Stop Thread on EOF? : should be TRUE. It will stop the JMeter test automatically once we tested for all the rows.
- In Thread Group, select the ‘For Ever’ check box in the Loop Count.
Parameterize:
Instead of sending the hard coded book id, lets parameterize it by using the value from the ‘id’ column of the CSV file.
That’s it. If you run the test now, it should send 6 requests one by one for each row in the CSV file.
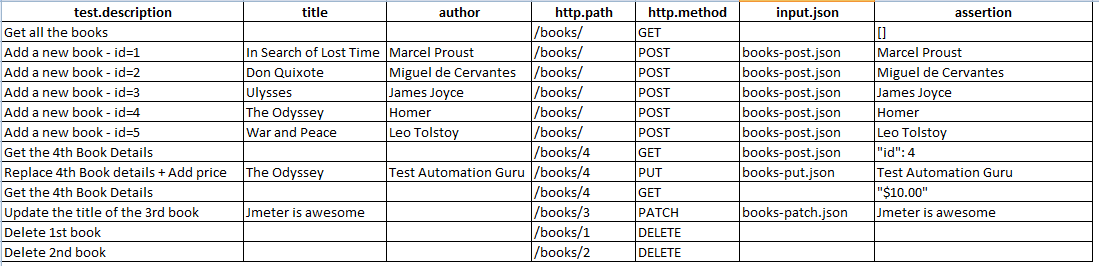
We can do a lot better than this – what if there are different types of request – GET / POST / DELETE / PUT / PATCH etc. It is super easy with JMeter. I drive my tests completely through a spreadsheet as shown here. Please check here for the advanced usage of JMeter – REST API – Data-Driven testing

Assertion:
If we can send the request and get the response, are we done? Nope!! But, We are almost there!!
We need to validate if we get the expected response. So, one last step would be to add the assertion.
I have the expected book name and price details in the CSV file shown in the above example. Lets use those details to check if our API works as expected.
Add Response Assertion under HTTP Request as given below. We need to verify if we have the expected book name and price in the response. Add them as given below.
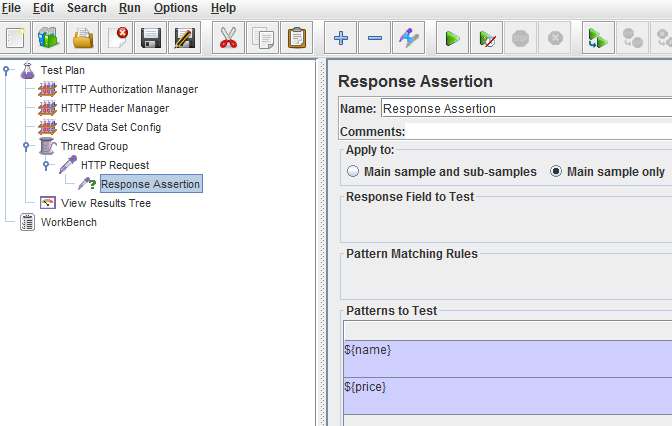
This assertion will validate the response and Pass/Fail the test accordingly. (Ensure that Pattern Matching Rules is ‘Contains’ as we are checking only for the book name and price. We are not verifying the whole response.)
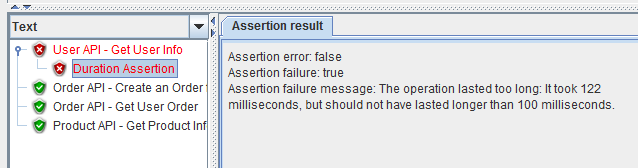
Duration Assertion:
JMeter not only verifies text – but also the ‘time‘ the request took. If we add ‘Duration Assertion’ and set an acceptable time limit, JMeter can confirm if the response was received within the time limit.

Extracting Data From JSON Response:
Sometimes you might want to extract specific data from JSON response and pass this data to the subsequent request in JMeter. JMeter provides a JSON Extractor to extract particular value from the JSON response.
Lets assume, my sample response looks like this.
{
   "title":"In Search of Lost Time",
   "author":"Marcel Proust",
   "id":1
}
I could add a JSON Extractor as shown below to extract the value of the author into the variable authorValue.
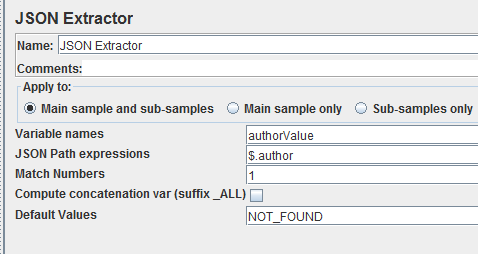

- $ refers to the root element in the JSON Path expressions
- ‘author’ is immediate child of the root element. So it can be accessed using $.author
- Match Number gives the Nth match. If you want all the matching value in an array, Match Numbers should be -1
- Default Values – used when there is no match
Lets consider below JSON response
{
   "store":{
      "book":[
         {
            "category":"reference",
            "author":"Nigel Rees",
            "title":"Sayings of the Century",
            "price":8.95
         },
         {
            "category":"fiction",
            "author":"Evelyn Waugh",
            "title":"Sword of Honour",
            "price":12.99
         }
      ],
      "bicycle":{
         "color":"red",
         "price":19.95
      }
   }
}- To get the first book price – $.store.book[1].price
- To get all prices from category – $..price
More information on this can be found here.
Performance Testing on REST API:
You might have verified the API functionality!
But, How do we know that about the following information on the API?
- Response time it takes
- Concurrent users it can support
- User load at which it breaks
- CPU/Memory usage
- Memory leak
JMeter can help here as well by using the same test we had just created!!
- Update the Number of thread in the Thread Group. If you enter 10 as number of users & run, JMeter will simulate 10 concurrent users.
- Update the Ramp up period (in seconds). For ex: If you have 10 users & 50 seconds as Ramp up period, JMeter will start creating 1 virtual user for every 5 seconds.
- Loop count: Select ‘Forever’.
- Under Scheduler, enter Duration in seconds. [Entering 600 will run the performance test for 10 mins with 10 Virtual Users.]
- Update CSV Data Set Config : ‘Recycle on EOF?’ – set it to TRUE – [FALSE will read the CSV data only once. We need enough data for VUsers to run for 10 mins. So setting it to TRUE will feed the same set of test data once it is read]
- Add a ‘Aggregate Report’ listener under the Test Plan.
Run your Meter test now. ‘Aggregate Report’ will give a basic idea of your REST API performance metrics like number of requests made in given duration, average response time, throughput, ‘90% line’ etc. [Note: It is not a good practice to run JMeter performance test in GUI mode as we just did now as it consumes more memory. Please check this Tips & Tricks for the best practices to be followed.]
Summary:
We just have created a Simple Data Driven Framework to test the functional behavior of REST API using JMeter without using any programming language. We also saw how to do performance testing on our API using JMeter by reusing the same script created for functional testing.
You might want to continue reading more about for the advanced usage of JMeter – REST API – Data-Driven testing
Are you new to JMeter? – Then you should totally check this article out which gives more information on the JMeter best practices and common mistakes beginners make.
Happy Testing & Subscribe 🙂